The Expiry Date defines as the last date which the Member Card can be used and it is also related to the bad list control if the system is required to support lost Member Card replacement.
There are 3 different choices of Member Card expiry schemes:
Fixed Month
Relative to Card Initializing Date
Automatic expiry extension based on the last visit.
In scheme 1, Fixed Month, you simply decide which month of the year you want the Member Card to be expired. For example, the current month is February and the expiry month is set as January. The Member Card will not be able to use in January of next year.
In scheme 2, Relative to Card Initializing Date, you have to define the number of months relative to the Member Card Initializing Date. For example, if you set 12 months and the Member Card is initialized on January 2002, the Member Card will be expired on January 2003.
In scheme 3, Automatic Expiry Extension Based on the Last Visit, the expiry date will be automatically extended by the administrator defined periods (months) if Members purchase, redeem, or reload before the card expires.
Some points to note about the calculations of expiry date
If the mode of expiry is set to be fixed month mode, for example month of expiry is set to December, (i.e. the exact date of expiry is 31 Dec.), and the expiry date on the card is 31 Dec 2004, within the period between two months before the expiry day to two months before the expiry date of the next year, (i.e. 1 Nov 2004- 31 Oct 2005), the date of expiry of the card will be extended to 31 Dec 2005. If the card renewal is earlier than two months before the date of expiry (i.e. 31 Oct 2004 or before), the card won’t be extended.
If the date of expiry assignment is relative to card initialization day(fixed relative), for example 12 months relative to the card initialization day. The date of expiry will be extended by 12 months based on the current date in the Terminal. The new expiry date will be rewritten as the end of the next 12 month.
To set expiry mode:
|
While in Standby Mode, press the Func key to enter the Setup Menu. You will be prompted to enter the Administrator Password as shown |
TUE 07 SEP 15:45 Bonus Terminal |
|
|
|
|
Enter the Administrator Password and press Func (default password: 123). |
Enter Password: *** |
|
|
|
|
Enter 3 to select the Set Expiry Mode menu. |
Current Mode: NO EXPIRY |
|
|
|
|
Press 1 to choose using server settings. Press 2 to set new expiry mode. |
Server Settings? Yes/No (1/2)? |
|
|
|
|
Press 1 to choose Yes. |
Use Expiry Date Yes/No (1/2)? |
|
|
To choose Fixed Month mode:
|
Press 1 to choose Fixed mode. |
Fixed/ LastVisit Mode (1/2)? |
|
|
|
|
Press 2 to choose absolute expiry month. |
Relative / Abs. Month (1/2)? |
|
|
|
|
Enter the expiry month by number and press Func to confirm. |
1:Jan --> 12:Dec _ |
|
|
|
|
It is done! |
Done!
|
|
|
To choose the mode of Relative to Card Initialized Date:
|
Press 1 to choose Fixed mode. |
Fixed/ LastVisit Mode (1/2)? |
|
|
|
|
Press 1 to choose relative expiry month. |
Relative / Abs. Month (1/2)? |
|
|
|
|
Enter the number of month relative to the member card initialize date. Press Func to confirm.
|
No. of Months: _ |
|
|
|
|
It is done! |
Done!
|
|
|
To choose the mode of Automatic Expiry Extension Based on the time of last visit:
|
Press 2 to choose Fixed mode. |
Fixed/ LastVisit Mode (1/2)? |
|
|
|
|
Enter the number of month you want to extend for each member card transaction. Press Func to confirm. |
#Extended Month _ |
|
|
|
|
It is done! |
Done!
|
|
|
New Member Card has to be initialized before it can be used. Only blank card with key FFFFFFFF can be initialized. The initialization process adds the necessary security key, data structure, Company Code, and a unique Card ID onto a blank card. After initialization, a “brand new card” is created. If any member card transaction is done on the card, like reloading money or adding bonus point, the card will be changed to a member card. A brand new card can be formatted to be a staff card as well. Only before any member card transaction is made, can the brand new card be converted to be a staff card.
Before any card initialization can be done, card formatting quotas have to be loaded from Master Card first. 100 quotas are loaded at a time.
Make sure that you have enough card formatting quotas loaded from master card. Please refer to master card section on how to do this.
|
While in Standby Mode, press the Func key to enter the Setup Menu. You will be prompted to enter the Administrator Password as shown |
TUE 07 SEP 15:45 Bonus Terminal |
|
|
|
|
Enter the Administrator Password and press Func (default password: 123). |
Enter Password: *** |
|
|
|
|
Enter 1 to select the Init Card menu. The number of card formatting quota and the card ID of the next formatted card is shown on the screen. |
Quota: 100 ID: 0000000100 |
|
|
|
|
Present a blank new card. Do not pick up the card until the writing is finished. |
Writing......... |
|
|
|
|
You can see a decrement and an increment in the value of quota and ID respectively. Present the next blank card again until the quota are used up or all card are formatted. Press ← to exit. |
Quota: 99 ID: 0000000101 |
|
|
In order to identify the person in charge of all monetary transaction, a staff card is needed to login the iBonus Terminal before any such transaction can be done. The staff card can only be used among the different Terminals in the same branch.
Staff Card is a conversion from newly initialized Brand New Card. You need to initialize a blank card first. The Set Staff Card function will also define the maximum transaction allowed (default: 1,000, maximum value: ,83,886,07 in decimal mode; 8,388,607 in integer mode).
To create a new staff card:
|
While in Standby Mode, press the Func key to enter the Setup Menu. You will be prompted to enter the Administrator Password as shown |
TUE 07 SEP 15:45 Bonus Terminal |
|
|
|
|
Enter the Administrator Password and press Func (default password: 123). |
Enter Password: *** |
|
|
|
|
Enter 4 to select the Staff Card menu. Press 1 to create new staff card. |
Create/Blacklist (1/2)? |
|
|
|
|
Enter the maximum value of every single transaction that the staff is allowed. Press Func to confirm. |
Max Transaction: $1,000.00 |
|
|
|
|
Present a newly initialized card. |
Create StaffCard Waiting Card... |
|
|
|
|
It is done! |
Done! ID: 0000000100 |
|
|
Card ID is normally used as a unique identification of each Member, but some companies prefer to use their existing ID nomenclature. The existing Customer ID (maximum 16 digits) can be entered through Terminals. There is a transaction record stored in the Terminal for this assign Customer ID action.
As the Customer ID is typed manually. Duplication might occur. If it happens, warning message will be shown when the card with duplicated customer ID is presented to the Terminal. Card Replacement by Customer ID for those cards will be denied until the customer ID of those cards is corrected. Please use Set Customer ID function with care.
To assign a member ID to the member:
|
While in Standby Mode, press the Func key to enter the Setup Menu. You will be prompted to enter the Administrator Password as shown |
TUE 07 SEP 15:45 Bonus Terminal |
|
|
|
|
Enter the Administrator Password and press Func (default password: 123). |
Enter Password: *** |
|
|
|
|
Enter 8 to select the Assign Customer ID menu. Enter the member’s ID and press Func. |
Customer ID: 123_ |
|
|
|
|
Present card. |
123 Waiting Card... |
|
|
|
|
It is done! |
Member Card Updated OK! |
|
|
|
|
Press Func to set another customer ID with an incremented value or enter any numbers to set manually. |
Customer ID: 124 |
|
|
|
|
It is done! |
Member Card Updated OK! |
|
|
The access log, member-card initialization quota or everything can be reset to factory default. Also you can reboot or shutdown the Terminal.
To reset the Terminal:
|
While in Standby Mode, press the Func key to enter the Setup Menu. You will be prompted to enter the Administrator Password as shown |
TUE 07 SEP 15:45 Bonus Terminal |
|
|
|
|
Enter the Administrator Password and press Func (default password: 123). |
Enter Password: *** |
|
|
|
|
Enter 7 to select the Shutdown/ Reset menu. Enter the member’s ID and press Func. Press 1 if you wish to reset the access log. |
Reset Log Yes/No (1/2)? |
|
|
|
|
Enter 1 if you wish to reset the Terminal back to factory default. Please note that company code is removedin the Terminal and card initialization quota will be reset to zero. |
Factory Default Yes/No (1/2)? |
|
|
|
|
Enter 2 if you wish to reset the card initialization quota. |
Reset Quota Yes/No (1/2)? |
|
|
|
|
If you wish to reboot the Terminal without resetting anything simply answer no in the three questions above. |
Shutting Down ...... |
|
|
Staff card can be blacklisted by entering a Staff ID of the lost card. To blacklist a staff card, the Terminal has to be connected with the iBonus Server. Steps are as follows:
|
While in Standby Mode, press the Func key to enter the Setup Menu. You will be prompted to enter the Administrator Password as shown |
TUE 07 SEP 15:45 Bonus Terminal |
|
|
|
|
Enter the Administrator Password and press Func (default password: 123). |
Enter Password: *** |
|
|
|
|
Enter 4 to select the Staff Card menu. Press 2 to blacklist a staff card. |
Create/Blacklist (1/2)? |
|
|
|
|
Enter the staff ID, i.e. card ID of the staff card. Press Func to confirm. |
Staff ID: _ |
|
|
|
|
It is done! |
Request Sent! |
|
|
Bonus rate can only be $1 = 1 point in bonus mode. Therefore this option cannot be changed when it is in Bonus Mode. However, when it is in Prepaid Mode, administration can set whether the same amount of bonus points comes with every Card Purchase transaction.
To change this option:
|
While in Standby Mode, press the Func key to enter the Setup Menu. You will be prompted to enter the Administrator Password as shown |
TUE 07 SEP 15:45 Prepaid Terminal |
|
|
|
|
Enter the Administrator Password and press Func (default password: 123). |
Enter Password: *** |
|
|
|
|
Enter 0 to select the Set Bonus Rate menu. |
Current Setting $1 = 1 point |
|
|
|
|
Enter 1 to use bonus point. Enter 2 otherwise. |
Use Bonus Yes/No (1/2)? |
|
|
|
|
You can see the new setting displayed as shown. |
New Setting $1 = 1 point |
|
|
To de-register an iBonus Terminal from the iBonus Server, the Terminal has to be connected with the iBonus Server. Steps are as follows:
|
While in Standby Mode, press the Func key to enter the Setup Menu. You will be prompted to enter the Administrator Password as shown |
TUE 07 SEP 15:45 Bonus Terminal |
|
|
|
|
Enter the Administrator Password and press Func (default password: 123). |
Enter Password: *** |
|
|
|
|
Enter 9 to select the De-register Terminal menu. |
Deregister Terminal... |
|
|
|
|
Press 1 to deregister the Terminal. |
Are you sure Yes/No (1/2)? |
|
|
|
|
Press ← if you wish to interrupt the deregistration process. |
Send Transaction 15/100 done |
|
|
|
|
If some transactions are not sent to server at the time when the ← is pressed, the following message is shown. |
Transaction left 85 |
|
|
|
|
|
Terminal not Deregistered |
|
|
As the language file in iBonus Terminal defines the language of receipt and the language of the LCD. The language setting menu is in the receipting menu. To change the language settings:
|
While in Standby Mode, press the Func key to enter the Setup Menu. You will be prompted to enter the Administrator Password as shown |
TUE 07 SEP 15:45 Bonus Terminal |
|
|
|
|
Enter the Administrator Password and press Func (default password: 123). |
Enter Password: *** |
|
|
|
|
Enter A to select the Receipt Type menu. Default language is in English. |
Default Language English |
|
|
|
|
If there are additional languages available, simple select the language you wish to use. |
Select Language: 1)Chinese, 2)Korean (1-2)? |
|
|
|
|
Enter either 1 or 2 for the number of copies. |
Number of Copies: (1/2)? |
|
|
|
|
Enter 1 if you want to print the system configuration parameters.
|
Print Sys Config Yes/No (1/2)? |
|
|
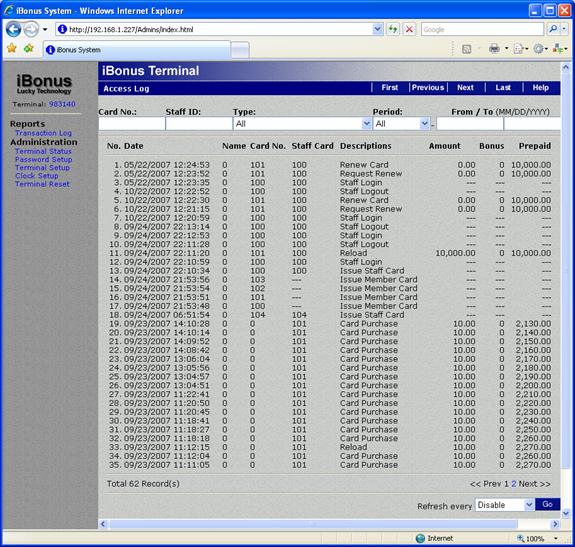
Transaction Logs stored in the iBonus Terminal can be viewed at the web administrative interface. To view the Transaction Log:
Browse your iBonus Terminal with browser
Click Transaction Log at the menu.