iBonus Server provides two types of reporting programs:
Reporting application
Report for Microsoft Reporting Service
Reporting Functions are provided in iBonus Server CD.
Reporting Application is a simple reporting program for those who do not have reporting service installed in the Server. It can also act as a monitor to check the status of all Terminals.
To execute reporting Application:
Click <start> à <iBonus Server 3> à <iBonusReport>
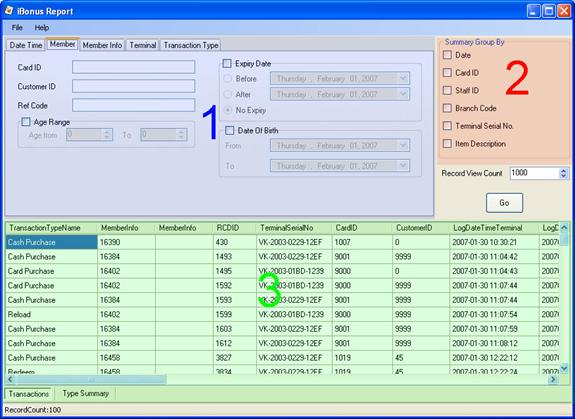
The reporting program is divided to 3 areas:
Constraints
Grouping criteria
Result
iBonusReport let you set the following constraints:
Date time, member info, member profile, terminal and transaction type
The results can be grouped by the following fields:
Date, Card ID, Staff ID, Branch Code, Terminal Serial No, Item Description
The following reports are available as result:
Transaction Log, Type Summary, Cash Summary and Bonus Point Summary
To monitor terminal status
Click <Check> at menu bar
Click <Terminal status>
The terminal status report will be refreshed periodically.
To execute a report generation:
Enter the criteria at the constraint area.
Select the grouping criteria.
Select the maximum number of transaction you want to show.
Click <Go>
Note:
If no constraint is selected, all transaction will be counted
If no grouping is selected, transaction report is generated; Otherwise, Cash Summary and Bonus Point Summary are generated.
Maximum number of transaction does not affect the summary report
All the report can be exported to excel .CSV format.
To export the transaction report:
Click <File> on menu bar à Click <Export Transaction…> à Enter the path of the .csv file.
To export the summary report:
Click <File> on the menu bar -> Click <Export Summaries…> à Select one of the summary report at the sub menu. à Enter the path of the .csv file.
To export the terminal status report:
Click <File> on the menu bar -> Click <Terminal status…> à Select one of the summary report at the sub menu. à Enter the path of the .csv file.
Sample reports for Reporting Service are provided. IIS is required for reporting server. Microsoft Reporting Service provides function which allows the result to be exported to excel, .tiff graphic, pdf and XML.
The following reports are bundled:
AccessLog That which queries the transaction log table
RenewRequests That which queries the RenewRequests table
RepairRequests That which queries the RepairRequests table
ReplaceRequests That which queries the ReplaceRequests table
Terminals That which queries the Terminal table
Staff That which queries the Staff table
Member That which queries the Member table
Grouping That which summarizes the amount of different value transaction and group them by date, member card ID, staff ID, branch code and customer’s age.
Redemption That which summarizes the amount of different item redeemed (including manual redeem) at a particular time period. The time period can be branched to quarter, month, week and day.
Sales That which summarizes the amount of all value type transactions at a particular time period. The time period can be branched to quarter, month, week and day.
For detail about the content of the database table, please see appendix.
Samples reports in reporting service are provided for basic queries. IIS is required for using Reporting Service.
Procedure for installing reporting service:
Use
web browser to browse to http://localhost/Reports/. Upload the reports
files (.rdl) which are located in the <installation folder>/Reports/
of iBonus Server.
If the SQL Server is located in another computer, replace the path
localhost by the path of the other computer.
Create Data Source.
In Data Source, click new data source.
Specify a name, e.g iBonus
Specify your connection type. e.g Microsoft SQL Server
Specify the connection string of the database. e.g Data Source=localhost; Initial Catalog=iBonus
Specify the credential if you want the user to view the report securely. e.g The credentials stored securely in the report server.
Then type the user name and password that has privileged to view the report.
Click Apply
Upload report files
Click Home -> Upload File
Please browse the .rdl file.
Specify a name of the report.
Click OK
Repeat step a - d till all the .rdl files are uploaded.
Link up the report to the specified data source
Click on the link of a report e.g AccessLog
If it shows "The report server cannot process the report. The data source connection information has been deleted.". Click Properties à Data Source.
Click Browse button to use shared data source.
Select the data source you have just created.
Click OK
Repeat step a - e until all the reports have been setup.